Generic Workflow

To add a new workflow:

  1. Open the Project Director Administration dashboard and click Workflows folder.

    The Workflows page appears.

  2. Click Add Workflow.

    The Workflow Modeler dialog box appears.

  3. Enter the Workflow Name.
  4. Click 
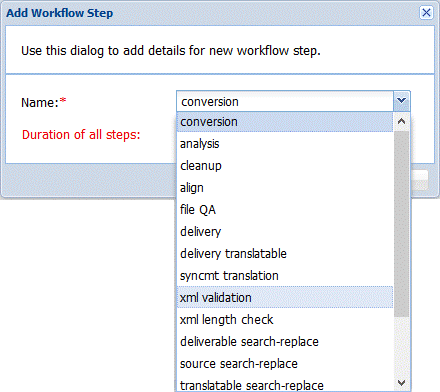
to add an automatic step.

    The Add Workflow Step dialog box appears.

  5. Select conversion from the drop down list and click OK. To learn more about the system workflow steps, refer to System Workflow Step Definitions.
  6. Repeat step 4, select analysis, and click OK.
  7. Click to add a manual step.

    The Add Workflow Step dialog box appears.

  8. Complete the following entries:

    Option

    Description

    Name

    Enter the workflow step name, e.g., Translation.

    Phase Roles

    Enter the phase role. e.g., Project_Translation. For a Vendor user to claim a task they need to be assigned on the Vendor tab of a project using this workflow.

    Vendor Actions

    Release

    (Optional) Enable Release action for the current step. This allow Vendors to release a claimed task.

    Reserve

    (Optional) The Reserve action will not be active for the first manual workflow step but can be enabled for subsequent manual workflow steps. If Reserve is selected for a phase, Vendors are able to pre-reserve the task. Once a reserved task becomes available it will appear in the Vendor's Inbox automatically.

    Release Reserved

    (Optional) Enable Release Reserved action for the current step. This allows Vendors to release a reserved task (where release itself is only for claimed tasks).

    Request Phase Deadline Change

    (Optional) Enable Request Phase Deadline Change action for the current step. This allows Vendors to request phase deadline change.

    Deliverable Collateral

    (Optional) Enable Deliverable Collateral action for the current step. This allows Vendors and Submitters to upload additional collateral to the deliverable.

    Format Options

    Translatable

    (Optional) Enable to provide the translatable – TXML or TXLF file format when user claims a submission.

    Native Format

    (Optional) Enable to provide the native – translated original file format when user claims a submission.

    Validate Translation

    (Optional) Enable to validate that all segments are translated and the Submission ID is correct. The general validations are:

    • File name must match. This is however a partial check. If the user adds text before PD file name starts or before the file extension or double up the extension, PD will still accept the file

    • User has upload permission for the workflow phase and target

    The content validations are:

    • Non-parsable: same as source check (file must not be same as source)

    • TXML/XLIFF

      • language codes match check (TXML header must match target)

      • check empty target (if not allowed empty targets attribute present in TXML)

      • file must not be same as first TXML (original TXML converted from source), however files can be same between phases

      • checksum TXML attribute value of first target (converted) and uploaded must not be same.

    Upload PDF Preview

    (Optional) Enable a PDF upload and download along with the translatable files and/or edited native files. This option is useful for DTP steps to allow linguists to preview the final file and then annotate that PDF with final changes to be incorporated by DTP.

    This is a prerequisite for DTP Review step.

    Note:   

    The Native and PDF files or Native and TXML files can be combined, but all three of them cannot be combined.

    Duration

    Enter a value for duration percentage of this workflow step. e.g., 45. The sum total duration for all manual steps must be equal to 100 (%).

  9. Click OK.
  10. Click to add another manual linguist step, e.g., Review Step.
  11. Repeat step 8.
  12. Optionally, a Demote to phase can be configured. Select the Demote Phase option to enable demote workflow option.
  13. Click and add 3 more automatic steps: store linguistic history, cleanup, and align.
  14. Complete the following entries:

    Option

    Description

    Auto delivery

    (Optional) Enable to automatically deliver completed submission to the configured delivery profile. If web service is used then this should be left unchecked.

    Auto Finish

    (Optional) Enable to automatically finish workflow when submission is completed. If unchecked, the Project Manager will be able to do final check on the deliverables before manually clicking Finish.

  15. Click OK to save workflow configuration.

    The Workflow Modeler dialog box appears with all the added workflow steps.

  16. If required, click options to arrange the workflow steps in the correct order.
  17. Click Save.

    The created workflow will appear in the Workflows page on the dashboard.