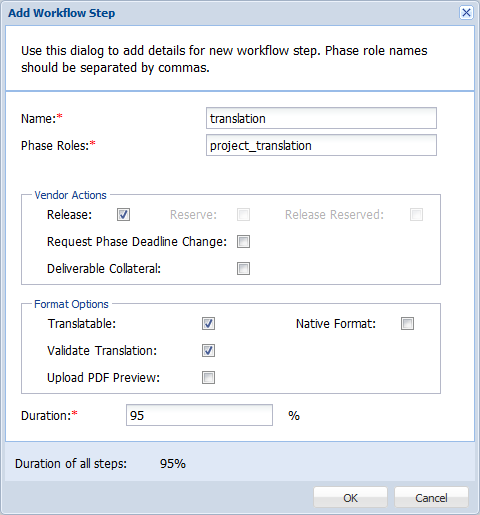
XML Workflow

To add a workflow for parsing XML files:

  1. Open the Project Director Administration dashboard and click Workflows folder.

    The Workflows page appears.

  2. Click Add Workflow.

    The Workflow Modeler dialog box appears.

  3. Enter the Workflow Name.
  4. Click to add an automatic step.

    The Add Workflow Step dialog box appears.

  5. Select conversion from the drop down list and click OK. To learn more about the system workflow steps, refer to System Workflow Step Definitions.
  6. Repeat step 4, select analysis and click OK.
  7. Click to add a manual step.

    The Add Workflow Step dialog box opens.

  8. Complete the following entries:

    Option

    Description

    Name

    Enter the workflow step name as Translation.

    Phase Roles

    Enter the phase role as project_translation.

    Vendor Actions


    Release

    (Optional) Enable Release action for the current step.

    Reserve

    (Optional) The Reserve action will not be active for the first manual workflow step but can be enabled for subsequent manual workflow steps.

    Release Reserved

    (Optional) Enable Release Reserved action for the current step. This allows vendors to release a reserved task (where release itself is just for claimed tasks).

    Request Phase Deadline Change

    (Optional) Enable Request Phase Deadline Change action for the current step. This allows vendors to request phase deadline change.

    Deliverable Collateral

    (Optional) Enable Deliverable Collateral action for the current step. This allows vendors and submitters to upload additional collateral to the deliverable.

    Format Options


    Translatable

    (Optional) Enable to provide the translatable &endash; TXML file format when user claims a submission.

    Native Format

    Not Applicable

    Validate Translation

    (Optional) Enable to validate that all segments are translated.

    Upload PDF Preview

    (Optional) Enable a PDF upload and download if more than one DTP step is configured on a workflow. It should be enabled for the first DTP step. The first DTP user may upload PDF documents for each language. DTP users in the next steps are able to download these PDF documents together with files in the native format.

    Duration

    Enter the duration of this workflow step.

  9. Click OK.
  10. Click and add up to five more automatic steps: file QA, xml length check, xml validation, cleanup and align.
      Note:

    The XML length checking rules should be added in the properties file. You can set character limit and data limit. An example screenshot of a single byte data limit rule is given below.

  11. Complete the following entries:

    Option

    Description

    Auto delivery

    (Optional) Enable to automatically deliver completed submission to the configured delivery profile. If web service is used then this should be left unchecked.

    Auto Finish

    (Optional) Enable to automatically finish workflow when submission is completed. If unchecked, the Project Manager will be able to do final check on the deliverables before manually clicking Finish.

  12. Click OK to save workflow configurations.

    The Workflow Modeler dialog box appears with all the added workflow steps.

  13. Click Save.

    The created workflow will appear in the Workflows page.