Setting up filters
A filter defines the working parameters for different types of files
received for translation. A filter can be selected from the available
list or a new format created. Find below a list of available filters.
Default
Filter |
Name |
File
type/extension |
|
|
|
ASP |
Active
Server Pages |
.asp |
Excel 2007 |
Microsoft
Excel 2007 and 2010 documents |
.xlsx,
.xlsm |
Excel |
Microsoft
Excel documents |
.xls |
HTM |
HTM
files |
.htm |
HTML |
HTML
files |
.html |
ICML |
Adobe
InCopy ICML files |
.icml |
IDML |
Adobe
InDesign IDML files |
.idml |
INX |
Adobe
InDesign INX files |
.inx |
JSP |
Java
Server Pages |
.jsp |
Java Properties |
Java.properties
files |
.properties |
MIF |
Adobe
Frame Maker files |
.mif |
PDF |
Adobe
PDF files |
.pdf |
Portable Object |
|
.po |
PowerPoint 2007 |
Microsoft
PowerPoint 2007 and 2010 files |
.pptx |
PowerPoint |
Microsoft
PowerPoint files |
.ppt |
Quark |
Quark
documents |
.tag |
RTF |
Rich
Text Format files |
.rtf |
SDLXLIFF |
SDLXLIFF
files |
.sdlxliff |
SRT |
SubRip
Text |
.srt |
TTX |
TRADOS
Bilingual files |
.ttx |
TXLF |
Wordfast
XLIFF files |
.txlf |
TXT |
Text
files |
.txt |
VDX |
Microsoft
Visio files |
.vdx |
Word 2007 |
Microsoft
Word 2007 and 2010 files |
.docx,
.docm, .dot, .dotm, dotx |
Word |
Microsoft
Word files |
.doc |
XLIFF |
XLIFF
files |
.xlf,
.xliff |
XML |
XML
files |
.xml |
Please note that the process to add MS Excel files is different from
the other file filters. Additionally, Wordfast Pro 3
supports only those TTX files that are translated and segmented using
tag editor. The TTX files must be renamed to match the source format if
they need to be viewed in tag editor.
Find below the procedures for the following tasks:
Selecting
filter settings
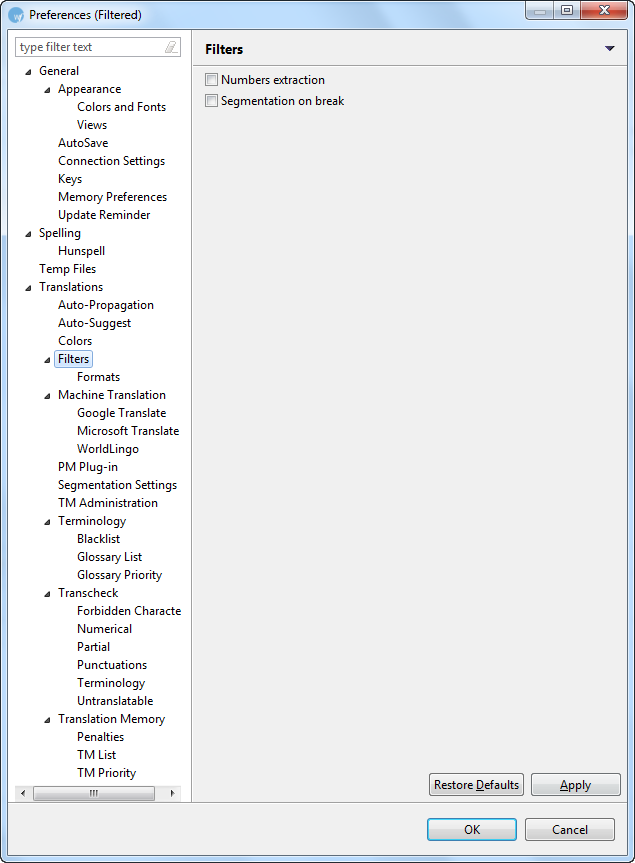
There are two common filter settings that can be enabled by navigating
to Edit > Preferences > Translations
> Filters as shown in the screenshot below.
Numbers extraction: Select to extract
all number-only segments to the translatable TXML file. Select to
clear the checkbox, and to exclude number only segments to the translatable
TXML file
Segmentation on break: Select to
segment the text at every logical break such as period (.) or soft
return.
Viewing
default file filters
A number of text-based filters (.htm, .html, .xml, .txt, .asp, .jsp)
are pre-configured for your convenience. For example, if you select the
Default Java Properties Filter, the Encoding UTF-8 is automatically selected.
To view a default file filter:
Open Wordfast Pro 3
and click Edit > Preferences >
Translations > Filters > Formats.
The Formats dialog box appears. The default filters appear in the Available
Formats box.
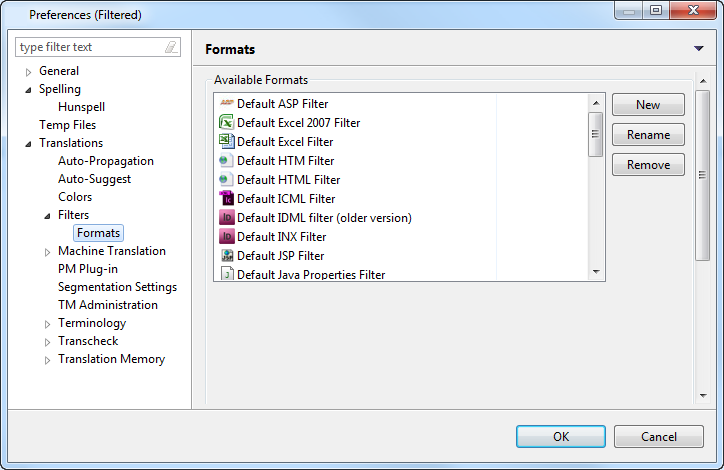
Select a default filter of
your choice. For example, if you select Default HTML Filter, the options
for HTML files appear in the Options box as shown below.
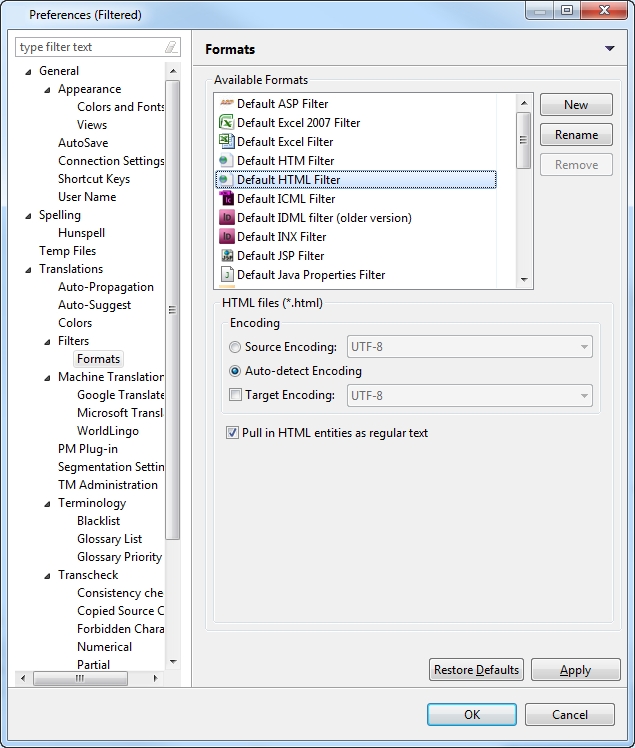
If required, you can modify
the default options. Default filters cannot be removed.
Adding
new file filters
If the filter of your choice is not available in the default option,
you can add a new filter. For XML and Excel filters you will need to provide
additional information.
Note: if a filter cannot be customized, it will not appear in the list
of filters that can be added.
To add a new file filter:
Follow steps 1 and 2 from
Viewing default file filters.
The Formats dialog box appears. The default filters appear in the Available
formats box.
Click New.
The New Format dialog box appears.
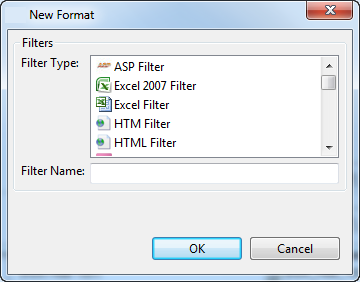
Select the desired filter
from the list, and click OK.
Selecting
FrameMaker filter preferences
The FrameMaker filter preferences must be set before using this filter
option.
To set FrameMaker filter preferences:
Open Wordfast Pro 3
and click Edit > Preferences >
Translations > Filters >Formats.
The Formats dialog box appears. The default filters appear in the Available
Formats box.
Select Format Type as Default
MIF Filter.
The FrameMaker Filter options appear.
Note: The MIF versions supported are 8, 9, 10, and 12.
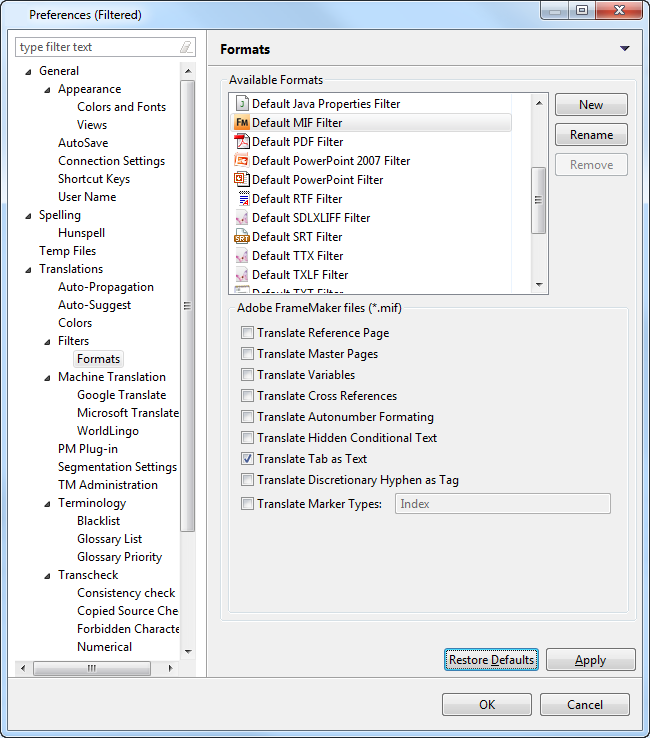
Select the required FrameMaker
filter preferences.
Select |
to... |
Translate Reference Pages |
send
reference pages for translation |
Translate Master Pages |
send
master pages for translation |
Translate Variables |
send
text marked as variable for translation. |
Translate Cross References |
send
text marked as cross reference for translation |
Translate Autonumber Formatting |
send
text with number formatting for translation. |
Translate Hidden Conditional Text |
send
text marked as hidden and conditional for translation. |
Translate Tab as Text: |
send
text containing tab spaces for translation. If unchecked,
a tag appears in the TXML instead of the tab. |
Translate Discretionary Hyphen
as Tag: |
send
text with discretionary hyphens for translation. Discretionary
hyphens are part of the source language, and are removed by
default. (Hard hyphens are always translated as tags in TXML
extraction.) If unchecked, these hyphens will be removed from
the file when sent for translation. |
Translate Marker Types |
send
text marked with a FrameMaker marker type for translation. |
Enter the Marker Type(s) that
should be included in the translation.
Enter the Table IDs of the
tables in the IDML that should be excluded in the translation.
Note: Use comma-separated values for Table IDs that are to be
included.
Click Apply
and OK, to confirm the FrameMaker
filter preferences.
Selecting ICML filter
preferences
The InCopy (ICML) filter preferences must be set before using this filter
option
To set the ICML filter preferences:
Open TransStudio and click
Edit > Preferences > Translations
> Filters >Formats.
The Formats dialog box appears. The default filters appear in the Available
Formats box.
Select Format Type as Default
ICML Filter.
The ICML Filter options appear.
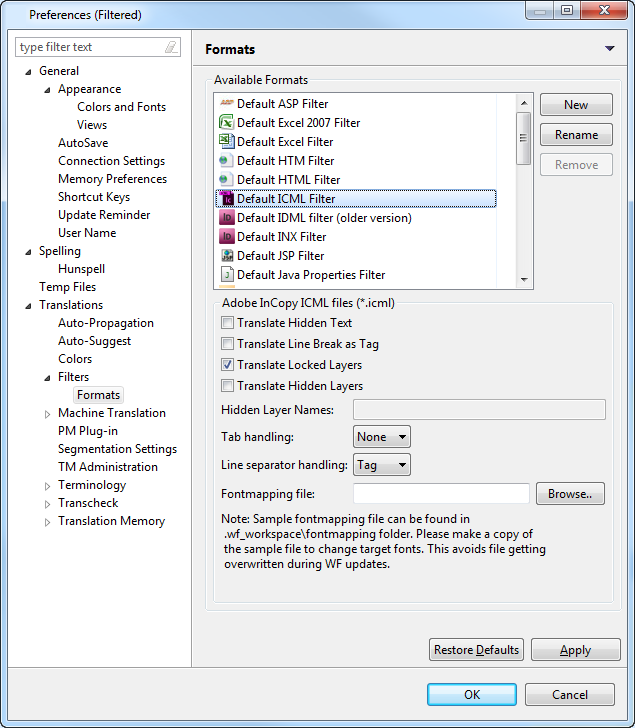
Select the properties for
the filter.
Select |
to... |
Translate Hidden Text |
translate
hidden text. |
Translate Line Break as Tag |
add
tags to line breaks, resulting in merged segments. |
Translate Locked Layers |
translate
text in locked layers. |
Translate Hidden Layers |
translate
hidden layers |
Enter the names of the Hidden
Layers to be translated.
Select the method for handling
tabs: None, Tag
or Break.
Select the method for handling
line separators: None, Tag or Break.
Enter or browse to the Fontmapping
file for the filter.
Rename the filter if desired.
Click OK.