Translating Submissions

When a submission has tasks to be worked on they appear in the vendor's (or translator's) dashboard as new submissions. E-mails are also sent to configured users. If the submission workflow includes the quote step, selected vendors can view the submissions for their assigned language in the Quote folder and provide a quote. Refer to Creating Quotes for more information. Once the quote is approved by the client, the vendor can proceed with translating the submission. If the submission workflow does not include the quote step, selected vendors can directly translate the submission. The translation vendor can proceed with translating the submission using the Translation Studio desktop application or any other preferred translation software.

To translate a submission:

  1. On the dashboard, view new submissions in the Available folder.
  2. Choose a submission and click Claim Translation under the translation tab.

    The Claim Translation dialog box appears.

      Note:

    You can preview the files before translating the submission by clicking on Preview Files under the translation tab.

  3. Check the checkboxes to select the batches you want to translate.
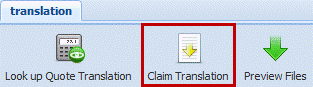
  4. Click Claim Translation.

    The Download File(s) dialog box appears.

  5. Click the Source Files checkbox to download the source files in the source file format.
  6. Click the Translation Kit checkbox to download the source files, reference files, glossary, TM leverage report and the local translation memory file.
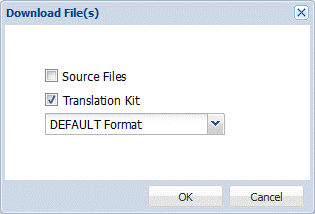
  7. Select the source file format of your choice based on your preferred translation tool.
      Note:

    You will be given a choice of default format (TXML/TXLF) or TTX format if the project is so configured by the System Administrator.

  8. Click OK.

    The Notification dialog box appears.

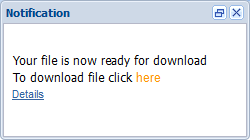
  9. Click on the here link to download the translation kit, which includes the source files, reference files, glossary, TM leverage report and the local translation memory file.
      Note:

    If you wish to download the translation kit later, you can do so by selecting the submission and clicking Get <Step name > Files in the Inbox folder. Refer to Downloading Claimed Submissions for more information.

  10. Click Save and choose a location to place the file(s).

    The chosen submission now moves to the Inbox folder.

      Note:

    The downloaded translation kit will include the following:

    • The For Translation folder includes the TXML/TXLF file(s) for translation with a prefix. The prefix details the source file format and the target locale.

      You will be given a choice of default format (TXML/TXLF) or TTX format if the project is so configured by the System Administrator.

    • The Reference folder includes files for reference during translation.

      The reference folder will appear only if the client submitter includes reference files in the submission.

    • The Glossary folder includes the glossary file in TXT format.

      The glossary folder will appear only if there is Term Manager integration set up for the client.

    • The Project TM folder includes the TM with fuzzy matches, which the translator can use while working offline.

      The Project TM folder will appear only if there are fuzzy matches found in the remote TM.

    • The Analysis folder includes the TM leverage statistics.

    • The Instructions and Project Background folders include special instructions and project background added by the client submitter, if any.