Cloning Submissions

To clone a submission:

  1. Open the Project Director dashboard and select an On Hold, Active or Completed submission.
  2. Click Clone Submission under the submit tab.
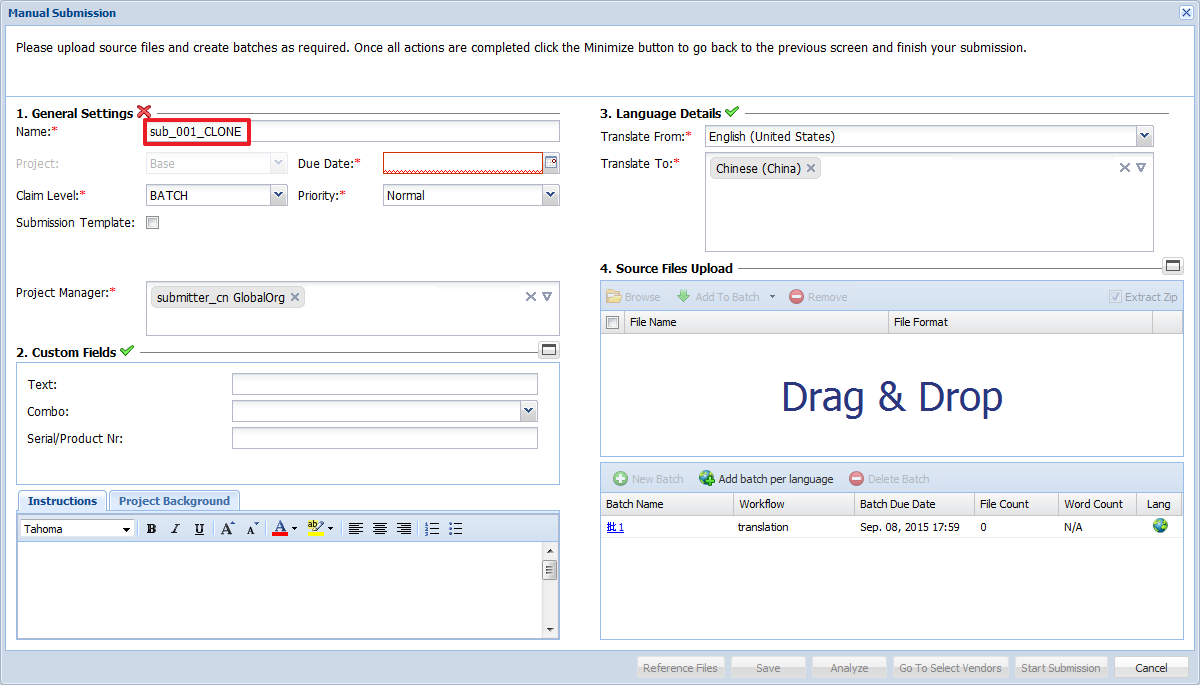
    The Manual Submission dialog box appears. The submission name will include a suffix _CLONE.

  3. Edit the Submission Name if necessary.
  4. Enter a Due Date.
      Note:

    Entering the Due Date is mandatory.

  5. Edit the General Settings and Language Details if necesary. Refer to Adding Submissions for more information.
  6. The Extract Zip checkbox is checked by default to automatically extract uploaded zipped files.
      Note:

    If you do not extract the files, the parsable files will not be analyzed against the translation memory. If you do not wish to extract a zipped file, uncheck the Extract Zip checkbox.

  7. Click to select the source file(s). You can also upload a batch as a zipped folder.
      Note:
    • If you are using Google Chrome you can drag and drop files into the Manual Submission dialog box.

    • If a particular file format is not configured, Project Director will categorize the uploaded files as Non-parsable.

    • For Excel files, content from all columns will be processed for translation unless a rules file has been provided and a specific Excel format setup for that configuration.

    • If the Microsoft Word filter is setup with the Accept all Changes and turn off Track Changes option turned off, then doc/docx files with Track Changes turned on will be rejected.

    • Embedded objects within MS Office source files such as Word, PPT and Excel will not be parsed.

    • The native InDesign filter uses InDesign Server version 5.5 or 6.0 to parse INDD files. While INDD files from older versions of InDesign will be accepted and parsed, the resulting deliverable IDML file will be CS 5.5 or 6.0. It is not possible to save down to a lower version.

    • If images within MS Office files require translation, provide a note in the Special Instructions field.

    • Do not upload reference files as source files. Be aware that all files uploaded in the Upload Source Files dialog box will be translated.

  8. Click Add To Batch to upload the source file(s).

    A new batch is created in the panel below.

      Note:

    You can divide the uploaded files into separate batches and upload different formats to a batch.

    Ensure that the name of the file being uploaded does not include the following characters: < (less than), > (greater than), : (colon), " (double quote), / (forward slash), \ (backslash), | (vertical bar or pipe), ? (question mark), * (asterisk). Project Director will reject files containing any of the system characters listed above.

  9. Click on the batch name to update the following. Refer to Editing Saved Submissions.
    • Batch Info: Name, Workflow, Source and Target Languages

    • Deadlines per language: Batch Due Date and phase due dates. Refer to Changing Phase Due Date

    • Add or Remove Files. Refer to Adding or Removing Submission Files

    • View leverage statistics

    • Click Translation Memories to view the TMs being leveraged.

  10. Once updated, you can upload reference files. Refer to Uploading Reference Files.
  11. Complete one of the following actions:
    • Click Save, to save the submission.

      A new submission is created in the On Hold folder with the Workflow Status Pending.

    • Click Analyze, to view the TM leverage statistics.

      A new submission is created in the On Hold folder with the Workflow Status Preflight.

    • Click Start Submission, to start the submission.

      A new submission is created in the Active folder with the Workflow Status In Progress.

  12. Click Cancel to cancel the submission.
      Note:

    If the Project includes the Quote step, vendors can now view the files, instructions and reference material, and proceed to create a Quote for the submission. The Vendor can claim the submission only after the Submitter approves the Quote. If the project does not include the Quote step, Vendors can proceed to claim the submission. If the Project includes an auto-Quote step, the Submitter or Project Manager can assign the vendor using their respective translation cost for the submission as a guide.